
iOS利用RunTime来实现万能跳转
1.万能跳转的应用场景:
(1)手机App通过推送过来的数据内容来跳转不同的界面,并把界面数据展示出来。
(2)手机内部根据不同的cell的点击事件,不同的数据跳转不同的界面。
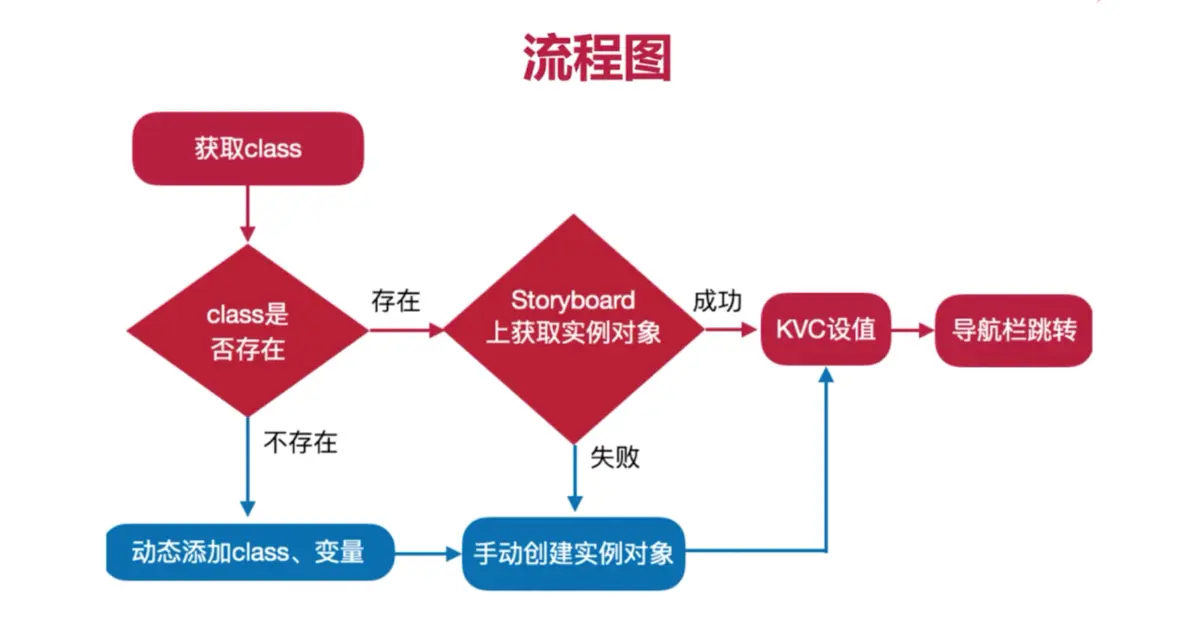
2.工作的流程图:
通过动态返回的数据中的class类名,来去查询class是不是存在:(1)存在则获取实例对象然后通过kVC来绑定数据然后去跳转。(2)不存在则动态创建class及其变量,然后手动创建实例对象在通过KVC来绑定数据,最后跳转。
3.主要方法:
//创建Class
    objc_allocateClassPair(Class superclass, const char * name, size_t extraBytes)
//注册Class
    void objc_registerClassPair(Class cls)
//添加变量
    class_addIvar(Class cls, const char * name,size_t size, uint8_t alignment , const char * types)
//添加方法
    class_addMethod(Class cls, SEL name, IMP  imp, const char * types)
//获取属性
    class_getProperty(Class  cls, const char * name)
//获取实例变量
    class_getInstanceVariable(Class cls, const char * name)
4.代码实现:
1、工程中新建三个控制器,命名为
FirstViewController
SecondViewController
ThredViewController
每一个控制器的viewDidLoad方法里面的内容为
self.view.backgroundColor = [UIColor redColor];

    UILabel * titleLab = [[UILabel alloc]initWithFrame:CGRectMake(100, 100, 200, 40)];
    titleLab.textColor = [UIColor blackColor];
    [self.view addSubview:titleLab];
    titleLab.text =self.name;
然后在ViewController模拟根据不同数据跳转不同界面,代码如下
#import "ViewController.h"
#import <objc/message.h>

@interface ViewController ()

@property (nonatomic, weak) UISegmentedControl * seg;

@end

@implementation ViewController

- (void)viewDidLoad {
    [super viewDidLoad];
    // Do any additional setup after loading the view, typically from a nib.
    self.view.backgroundColor = [UIColor yellowColor];

    NSArray * array = @[@"消息1",@"消息2",@"消息3",@"消息4"];
    UISegmentedControl * seg = [[UISegmentedControl alloc]initWithItems:array];
    seg.frame = CGRectMake(70, 200, 240, 45);
    [self.view addSubview:seg];
    seg.selectedSegmentIndex = 0;
    self.seg = seg;

    UIButton * jupBtn = [UIButton buttonWithType:UIButtonTypeCustom];
    jupBtn.frame = CGRectMake(100, 250, 60, 45);
    [jupBtn setTitle:@"跳转" forState:UIControlStateNormal];
    [jupBtn setTitleColor:[UIColor whiteColor] forState:UIControlStateNormal];
    jupBtn.backgroundColor = [UIColor redColor];
    [self.view addSubview:jupBtn];
    [jupBtn addTarget:self action:@selector(action) forControlEvents:UIControlEventTouchUpInside];

    //创建Class
    //objc_allocateClassPair(Class superclass, const char * name, size_t extraBytes)
    //注册Class
    //void objc_registerClassPair(Class cls)
    //添加变量
    //class_addIvar(Class cls, const char * name,size_t size, uint8_t alignment , const char * types)
    //添加方法
    //class_addMethod(Class cls, SEL name, IMP  imp, const char * types)
    //获取属性
    //class_getProperty(Class  cls, const char * name)
    //获取实例变量
    //class_getInstanceVariable(Class cls, const char * name)
}

-(void)action{

    NSDictionary * infoDic = nil;

    switch (self.seg.selectedSegmentIndex) {
        case 0:
            infoDic = @{@"class":@"FirstViewController",
                        @"property":@{
                                @"name":@"尼古拉斯赵四"
                                }
                        };
            break;
        case 1:
            infoDic = @{@"class":@"SecondViewController",
                        @"property":@{
                                @"age":@"26",
                                @"sex":@"男"
                                }
                        };
            break;
        case 2:
            infoDic = @{@"class":@"ThredViewController",
                        @"property":@{
                                @"teacher":@"王老师",
                                @"money":@"5000"
                                }
                        };
            break;
        case 3:
            //NewViewController
            infoDic = @{@"class":@"WorkerController",
                        @"property":@{
                                @"phoneNumber":@"17710948530"
                                }
                        };
            break;

        default:
            break;
    }

    [self pushToControllerWithData:infoDic];

}
-(void)pushToControllerWithData:(NSDictionary * )vcData{
    //1.获取class
    const char * className = [vcData[@"class"] UTF8String];
    Class cls = objc_getClass(className);
    if(!cls){
        //创建新的类,并添加变量和方法
        Class superClass = [UIViewController class];
        cls = objc_allocateClassPair(superClass, className, 0);
        //添加phoneNumber变量
        class_addIvar(cls, "phoneNumber", sizeof(NSString *), log2(sizeof(NSString *)), @encode(NSString *));
        //添加titleLab控件
        class_addIvar(cls, "titleLab", sizeof(UILabel *), log2(sizeof(UILabel *)), @encode(UILabel *));
        //添加方法,方法交换,执行viewDidLoad加载
        Method method = class_getInstanceMethod([self class], @selector(workerLoad));
        IMP methodIMP = method_getImplementation(method);
        const char * types = method_getTypeEncoding(method);
        class_addMethod(cls, @selector(viewDidLoad), methodIMP, types);
    }
    //2.创建实例对象,给属性赋值
    id instance = [[cls alloc]init];
    NSDictionary * values = vcData[@"property"];
    [values enumerateKeysAndObjectsUsingBlock:^(id  _Nonnull key, id  _Nonnull obj, BOOL * _Nonnull stop) {
        //检测是否存在为key的属性
        if(class_getProperty(cls, [key UTF8String])){
            [instance setValue:obj forKey:key];
        }
        //检测是否存在为key的变量
        else if (class_getInstanceVariable(cls, [key UTF8String])){
            [instance setValue:obj forKey:key];
        }
    }];

    //2.跳转到对应的界面
    [self.navigationController pushViewController:instance animated:YES];

}

-(void)workerLoad{
    [super viewDidLoad];
    self.view.backgroundColor = [UIColor greenColor];
    //初始化titleLab
    [self setValue:[[UILabel alloc]initWithFrame:CGRectMake(100, 100, 200, 40)] forKey:@"titleLab"];
    UILabel * titleLab = [self valueForKey:@"titleLab"];
    //添加到视图上
    [[self valueForKey:@"view"] performSelector:@selector(addSubview:) withObject:titleLab];
    titleLab.text =[self valueForKey:@"phoneNumber"];
    titleLab.textColor = [UIColor blackColor];

}

@end
5.demo的下载地址,喜欢的话给个星,谢谢:
iOS根据不同数据跳转不同界面,动态添加属性及其控件等界面内容
转自:https://www.jianshu.com/p/376a3bc7741b
