
Android四大组件的启动分析与整理(二):Service的启动过程
前言
换工作后,一直忙,没时间整理,逼自己一把吧,目标一周整理出来,理顺思路,这里先起个头。
service的启动过程分两种,一种是直接start,另一种是bind;我们先来分析第一种,直接start过程要简单的多。一样,先分析源码,然后一幅图总结:
startService()
	startService(new Intent());
public ComponentName startService(Intent service) {
return mBase.startService(service);
}
startService();其实是调用了ContextWrapper中的startService方法,ContextWrapper我的理解是一个外观模式,他基本没有什么自己的东西,而是都去间接调用mBase中的方法,mBase,其实就是Context的实现类ContextImpl类;在 Activity的启动过程 的最后已经介绍了,这个ContextImpl是怎么来的了,这里不多将,继续。
    public ComponentName startService(Intent service) {
warnIfCallingFromSystemProcess();
return startServiceCommon(service, false, mUser);
}
private ComponentName startServiceCommon(Intent service, boolean requireForeground,

            UserHandle user) {
try {
validateServiceIntent(service);

            service.prepareToLeaveProcess(this);

            ComponentName cn = ActivityManager.getService().startService(

                mMainThread.getApplicationThread(), service, service.resolveTypeIfNeeded(
getContentResolver()), requireForeground,
getOpPackageName(), user.getIdentifier());
..................
return cn;
} catch (RemoteException e) {
throw e.rethrowFromSystemServer();
}
}
这个地方非常熟悉了,调用了AMS的startService方法;
public ComponentName startService(IApplicationThread caller, Intent service,

            String resolvedType, boolean requireForeground, String callingPackage, int userId)
throws TransactionTooLargeException {
enforceNotIsolatedCaller("startService");
...............
synchronized(this) {
final int callingPid = Binder.getCallingPid();
final int callingUid = Binder.getCallingUid();
final long origId = Binder.clearCallingIdentity();

            ComponentName res;
try {

                res = mServices.startServiceLocked(caller, service,

                        resolvedType, callingPid, callingUid,

                        requireForeground, callingPackage, userId);
} finally {

                Binder.restoreCallingIdentity(origId);
}
return res;
}
}
这里将启动工作委托给了ActiveService,就像Activity启动的时候将委托工作交给ActivityStarter一样;
ComponentName startServiceLocked(IApplicationThread caller, Intent service, String resolvedType,
int callingPid, int callingUid, boolean fgRequired, String callingPackage, final int userId)
throws TransactionTooLargeException {
final boolean callerFg;
if (caller != null) {
final ProcessRecord callerApp = mAm.getRecordForAppLocked(caller);(1)
..................
} else {

            callerFg = true;
}

        ServiceLookupResult res =
retrieveServiceLocked(service, resolvedType, callingPackage,

                    callingPid, callingUid, userId, true, callerFg, false);(2)
..................

        ServiceRecord r = res.record;(3)
if (!mAm.mUserController.exists(r.userId)) {
return null;
}
..................

        ComponentName cmp = startServiceInnerLocked(smap, service, r, callerFg, addToStarting);(4)
return cmp;
}
这个方法很长,主要是为了获取ProcessRecorder和ServiceRecorder,就跟Activity启动需要ProcessRecorder和ActivityRecorder一样。
(2)处先从缓存中查找,没有的话直接new一个对象
(4)处继续调用startServiceInnerLocked方法,这个方法调用了bringUpServiceLocked()方法。
    private String bringUpServiceLocked(ServiceRecord r, int intentFlags, boolean execInFg,
boolean whileRestarting, boolean permissionsReviewRequired)
throws TransactionTooLargeException {
if (r.app != null && r.app.thread != null) {
sendServiceArgsLocked(r, execInFg, false);(1)
return null;
}
final boolean isolated = (r.serviceInfo.flags&ServiceInfo.FLAG_ISOLATED_PROCESS) != 0;
final String procName = r.processName;

        String hostingType = "service";

        ProcessRecord app;
if (!isolated) {

            app = mAm.getProcessRecordLocked(procName, r.appInfo.uid, false);
if (app != null && app.thread != null) {
try {

                    app.addPackage(r.appInfo.packageName, r.appInfo.versionCode, mAm.mProcessStats);
realStartServiceLocked(r, app, execInFg);(2)
return null;
}
}
} else {
.......................
}
if (app == null && !permissionsReviewRequired) {(1)
if ((app=mAm.startProcessLocked(procName, r.appInfo, true, intentFlags,

                    hostingType, r.name, false, isolated, false)) == null) {
bringDownServiceLocked(r);
return msg;
}
if (isolated) {

                r.isolatedProc = app;
}
}
.......................
return null;
}
(1)处是发送service的入参,就是走的onStartCommand()方法,这里第一次进来,app为null,因为ServiceRecorder是新new出来的
(2)从AMS中获取ProcessRecorder,获取到成功之后,调用realStartServiceLocked()方法去启动service
(3)如果上一步没有获取到ProcessRecorder,那么就创建一个,这个过程跟Activity创建进程是一样,都是通过Zygote去执行Process.start方法创建新的进程
    private final void realStartServiceLocked(ServiceRecord r,

            ProcessRecord app, boolean execInFg) throws RemoteException {
.................
try {
.................

            app.thread.scheduleCreateService(r, r.serviceInfo,mAm.compatibilityInfoForPackageLocked(r.serviceInfo.applicationInfo),

                    app.repProcState);(1)

            r.postNotification();

            created = true;
}
.................
sendServiceArgsLocked(r, execInFg, true);(2)
.................
}
(1)通知ApplicationThread去执行scheduleCreateService方法,
(2)创建完了之后,发送入参,也就是调用哦那onStartCommand()方法。
        public final void scheduleCreateService(IBinder token,

                ServiceInfo info, CompatibilityInfo compatInfo, int processState) {
updateProcessState(processState, false);

            CreateServiceData s = new CreateServiceData();

            s.token = token;

            s.info = info;

            s.compatInfo = compatInfo;
sendMessage(H.CREATE_SERVICE, s);
}
然后就是非常熟悉的地方了,发送handler:CREATE_SERVICE消息
                case CREATE_SERVICE:

                    Trace.traceBegin(Trace.TRACE_TAG_ACTIVITY_MANAGER, ("serviceCreate: " + String.valueOf(msg.obj)));
handleCreateService((CreateServiceData)msg.obj);

                    Trace.traceEnd(Trace.TRACE_TAG_ACTIVITY_MANAGER);
break;
private void handleCreateService(CreateServiceData data) {
unscheduleGcIdler();

        LoadedApk packageInfo = getPackageInfoNoCheck(

                data.info.applicationInfo, data.compatInfo);

        Service service = null;
try {

            java.lang.ClassLoader cl = packageInfo.getClassLoader();

            service = (Service) cl.loadClass(data.info.name).newInstance();(1)
}
.................
try {

            ContextImpl context = ContextImpl.createAppContext(this, packageInfo);(2)

            context.setOuterContext(service);

            Application app = packageInfo.makeApplication(false, mInstrumentation);(3)

            service.attach(context, this, data.info.name, data.token, app,

                    ActivityManager.getService());(4)

            service.onCreate();(5)

            mServices.put(data.token, service);
.................
}
.................
}
跟启动Activity一样,需要两个必备因素,Context和Application
(1)处跟Activity一样通过反射创建Service
(2)处new一个上下文,跟Activity的区别就是不需要传入AMS和classloader
(3)处跟Activity一样通过反射创建Application
(4)处attach上去,将context、app、AMS、binder等都封装进去
(5)处执行onCreate()方法,区别是Activity通过Instrumentation去创建,这里直接调用
bindService()
这里追加一下bindService的过程:
从调用bindService(new Intent(), mConnection, Context.BIND_AUTO_CREATE);开始,跟startService一样,走的context中的方法,然后调用了bindServiceCommon()
private boolean bindServiceCommon(Intent service, ServiceConnection conn, int flags, Handler

            handler, UserHandle user) {

        IServiceConnection sd;
if (conn == null) {
throw new IllegalArgumentException("connection is null");
}
if (mPackageInfo != null) {

            sd = mPackageInfo.getServiceDispatcher(conn, getOuterContext(), handler, flags);(1)
} else {
throw new RuntimeException("Not supported in system context");
}
validateServiceIntent(service);
try {
.............
int res = ActivityManager.getService().bindService(

                mMainThread.getApplicationThread(), getActivityToken(), service,

                service.resolveTypeIfNeeded(getContentResolver()),

                sd, flags, getOpPackageName(), user.getIdentifier());(2)
.............
} catch (RemoteException e) {
throw e.rethrowFromSystemServer();
}
}
(1)跟startService不一样的是,需要先获取IServiceConnection,从名字可以看出实现了binder,那么service就可以跨进程绑定了,IServiceConnection内部new了一个ServiceDispatcher对象,ServiceDispatcher的内部类InnerConnection就是继承了IServiceConnection.stub,实现binder的。
(2)走AMS的bindService方法,AMS委托给了ActiveService去执行bindServiceLocked()
    int bindServiceLocked(IApplicationThread caller, IBinder token, Intent service,

            String resolvedType, final IServiceConnection connection, int flags,

            String callingPackage, final int userId) throws TransactionTooLargeException {
final ProcessRecord callerApp = mAm.getRecordForAppLocked(caller);(1)
................

        ServiceLookupResult res =   (2)
retrieveServiceLocked(service, resolvedType, callingPackage, Binder.getCallingPid(),

                    Binder.getCallingUid(), userId, true, callerFg, isBindExternal);
................

        ServiceRecord s = res.record;
try {
................

            AppBindRecord b = s.retrieveAppBindingLocked(service, callerApp);(3)

            ConnectionRecord c = new ConnectionRecord(b, activity,

                    connection, flags, clientLabel, clientIntent);(4)
................
if ((flags&Context.BIND_AUTO_CREATE) != 0) {

                s.lastActivity = SystemClock.uptimeMillis();
if (bringUpServiceLocked(s, service.getFlags(), callerFg, false,

                        permissionsReviewRequired) != null) {(5)
return 0;
}
}
if (s.app != null && b.intent.received) {
try {

                    c.conn.connected(s.name, b.intent.binder, false);(6)
} catch (Exception e) {
}
if (b.intent.apps.size() == 1 && b.intent.doRebind) {
requestServiceBindingLocked(s, b.intent, callerFg, true);(7)
}
} else if (!b.intent.requested) {
requestServiceBindingLocked(s, b.intent, callerFg, false);(8)
}
getServiceMapLocked(s.userId).ensureNotStartingBackgroundLocked(s);
} finally {

            Binder.restoreCallingIdentity(origId);
}
return 1;
}
(1)处拿到请求者的进程
(2)处创建必备的条件:ServiceRecord
(3、4)处bind要比start多两个对象,AppBindRecord和ConnectionRecord,AppBindRecord对象是
(5)处因为flag是BIND_AUTO_CREATE,因此走bringUpServiceLocked方法去创建Service
(6)创建成功后,如果b.intent.received表示已经接受到了绑定的bind就会执行c.conn.connected,这个c.conn就是IServiceConnection,前面bindServiceCommon就讲了,ServiceConnection被封到了LoaderApk中的内部类ServiceDispatcher中,ServiceDispatcher的内部类innerConnection继承了IServiceConnection.stub类,并调用ServiceDispatcher的connect方法,并向mActivityThread 的handler发送一个runnable方法执行mConnection.onServiceConnected回调,到此绑定成功。
(7)如果第一次bind且还没有rebind过,requestServiceBindingLocked第三个参数为true表重新绑定
(8)如果创建成功还没有绑定,就执行requestServiceBindingLocked第三个参数为false
这里第一次bind应该是创建了但还没有发送请求,走的8;
private final boolean requestServiceBindingLocked(ServiceRecord r, IntentBindRecord i,
boolean execInFg, boolean rebind) throws TransactionTooLargeException {
if ((!i.requested || rebind) && i.apps.size() > 0) {(1)
try {
bumpServiceExecutingLocked(r, execInFg, "bind");

                r.app.forceProcessStateUpTo(ActivityManager.PROCESS_STATE_SERVICE);

                r.app.thread.scheduleBindService(r, i.intent.getIntent(), rebind,

                        r.app.repProcState);(2)
if (!rebind) {

                    i.requested = true; (3)
}

                i.hasBound = true;

                i.doRebind = false;(4)
} catch (TransactionTooLargeException e) {
.............
} catch (RemoteException e) {
.............
}
}
return true;
}
(1)第一次进来,i.requested没有发送过请求,因此为false,不是重新rebind,在创建AppBinderRecord的时候,i.apps.size() > 0;
(2)熟悉的一幕,发送scheduleBindService方法,然后发送BIND_SERVICE,然后执行handleBindService方法
(3、4)设置标志位,请求过了,非重绑
private void handleBindService(BindServiceData data) {

        Service s = mServices.get(data.token);
if (s != null) {
try {

                data.intent.setExtrasClassLoader(s.getClassLoader());

                data.intent.prepareToEnterProcess();
try {
if (!data.rebind) {

                        IBinder binder = s.onBind(data.intent);

                        ActivityManager.getService().publishService(

                                data.token, data.intent, binder);
} else {

                        s.onRebind(data.intent);

                        ActivityManager.getService().serviceDoneExecuting(

                                data.token, SERVICE_DONE_EXECUTING_ANON, 0, 0);
}
ensureJitEnabled();
} catch (RemoteException ex) {
}
} catch (Exception e) {
}
}
}
没有rebind过的话,通知AMS去执行publishService方法,如果是rebind操作,那么就直接s.onRebind方法,然后通知AMS绑定结束。这里第一次进来,通知AMS去publishService,然后委托ActiveService去执行publishServiceLocked方法;
void publishServiceLocked(ServiceRecord r, Intent intent, IBinder service) {
final long origId = Binder.clearCallingIdentity();
try {
if (r != null) {

                Intent.FilterComparison filter
= new Intent.FilterComparison(intent);

                IntentBindRecord b = r.bindings.get(filter);
if (b != null && !b.received) {

                    b.binder = service;

                    b.requested = true;(1)

                    b.received = true;(2)
for (int conni=r.connections.size()-1; conni>=0; conni--) {

                        ArrayList<ConnectionRecord> clist = r.connections.valueAt(conni);
for (int i=0; i<clist.size(); i++) {

                            ConnectionRecord c = clist.get(i);(3)
.....................
try {

                                c.conn.connected(r.name, service, false);(3)
} catch (Exception e) {
.....................
}
}
}
}
serviceDoneExecutingLocked(r, mDestroyingServices.contains(r), false);
}
} finally {

            Binder.restoreCallingIdentity(origId);
}
}
(1)处设置已请求,(2)处设置已绑定;(3)处就是调用IServiceConnection的connect方法。
		private static class InnerConnection extends IServiceConnection.Stub {
final WeakReference<LoadedApk.ServiceDispatcher> mDispatcher;
InnerConnection(LoadedApk.ServiceDispatcher sd) {

                mDispatcher = new WeakReference<LoadedApk.ServiceDispatcher>(sd);
}
public void connected(ComponentName name, IBinder service, boolean dead)
throws RemoteException {

                LoadedApk.ServiceDispatcher sd = mDispatcher.get();
if (sd != null) {

                    sd.connected(name, service, dead);(1)
}
}
}
public void connected(ComponentName name, IBinder service, boolean dead) {
if (mActivityThread != null) {(2)

                mActivityThread.post(new RunConnection(name, service, 0, dead));
} else {
doConnected(name, service, dead);
}
}
private final class RunConnection implements Runnable {
.........
public void run() {
if (mCommand == 0) {
doConnected(mName, mService, mDead);
} else if (mCommand == 1) {
doDeath(mName, mService);
}
}
.........
}
----------------doConnected-----------------

		mConnection.onServiceConnected(name, service);
在bind的第一步,其实就将ServiceConnection封装到了ServiceDispatcher中了,其内部类InnerConnection 继承了IServiceConnection.Stub,那么就可以通过binder进行跨进程的通信了,很方便。
上一步骤的(3)其实就是调用了innerConnection的connect方法(1)处
(2)处mActivityThread其实就是ActivityThread的handler方法执行run方法,简介调用了doConnected,然后调用mConnection的onServiceConnected()方法,这个mConnection其实就是我们自定义的ServiceConnection类,就此结束;
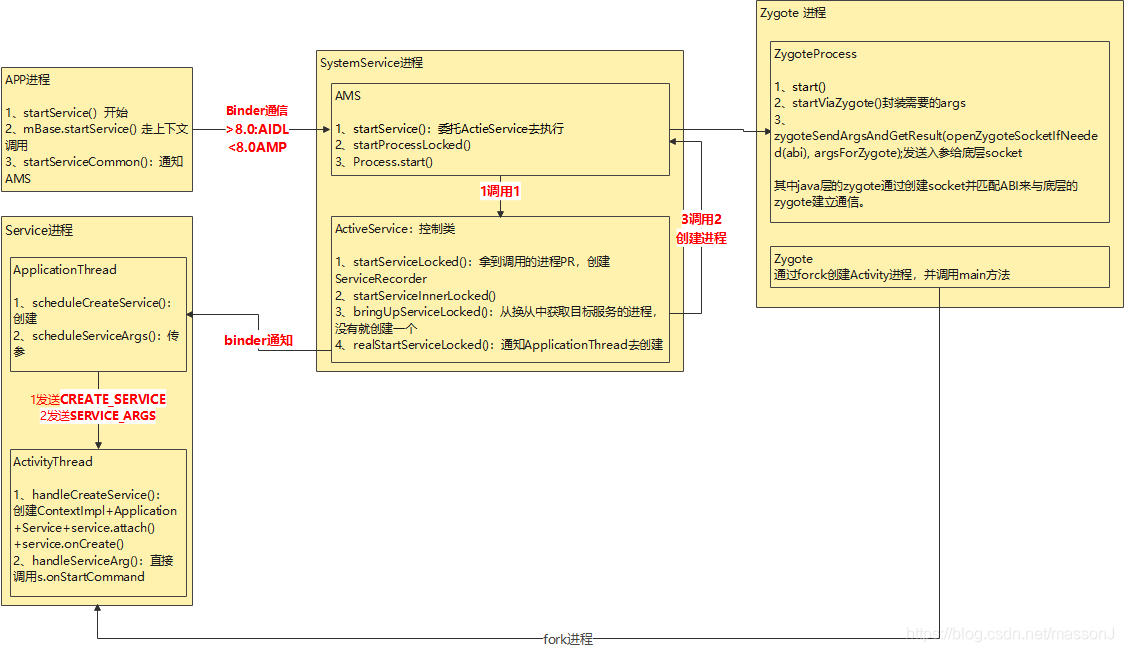
startService图解:
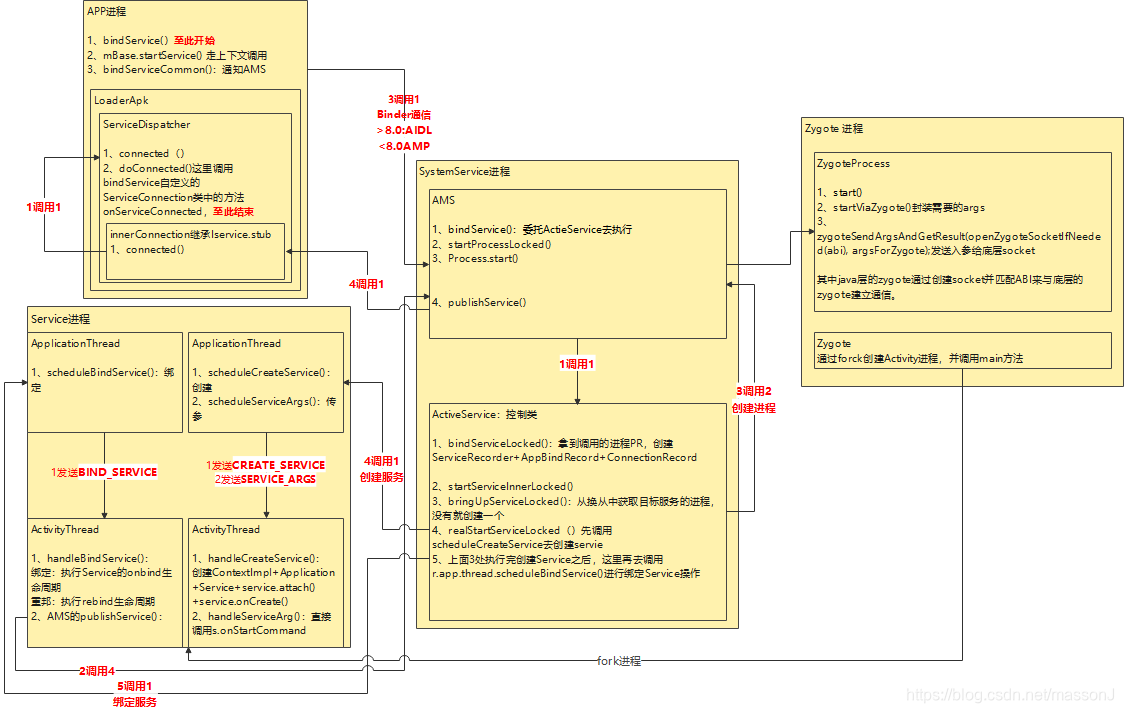
bindService图解:
————————————————
版权声明:本文为CSDN博主「蒋八九」的原创文章,遵循CC 4.0 BY-SA版权协议,转载请附上原文出处链接及本声明。
原文链接:https://blog.csdn.net/massonJ/article/details/117914349
