
用半天时间,threejs手搓了一个机柜
那是一个普通的周三早晨,我正对着产品经理刚丢过来的需求发呆——"在管理系统里加个3D机柜展示,要能开门的那种"。
"这不就是个模型展示吗?"我心想,"AI应该能搞定吧?"
9:30 AM - 启动摸鱼模式
我熟练地打开代码编辑器,把需求复制粘贴进AI对话框: "用Three.js实现一个带开门动画的机柜模型,要求有金属质感,门能90度旋转"
点击发送后,我惬意地靠在椅背上,顺手打开了B站。"让AI先忙会儿~"
10:30 AM - 验收时刻
一集《凡人修仙传》看完,我懒洋洋地切回编辑器。AI果然交出了答卷: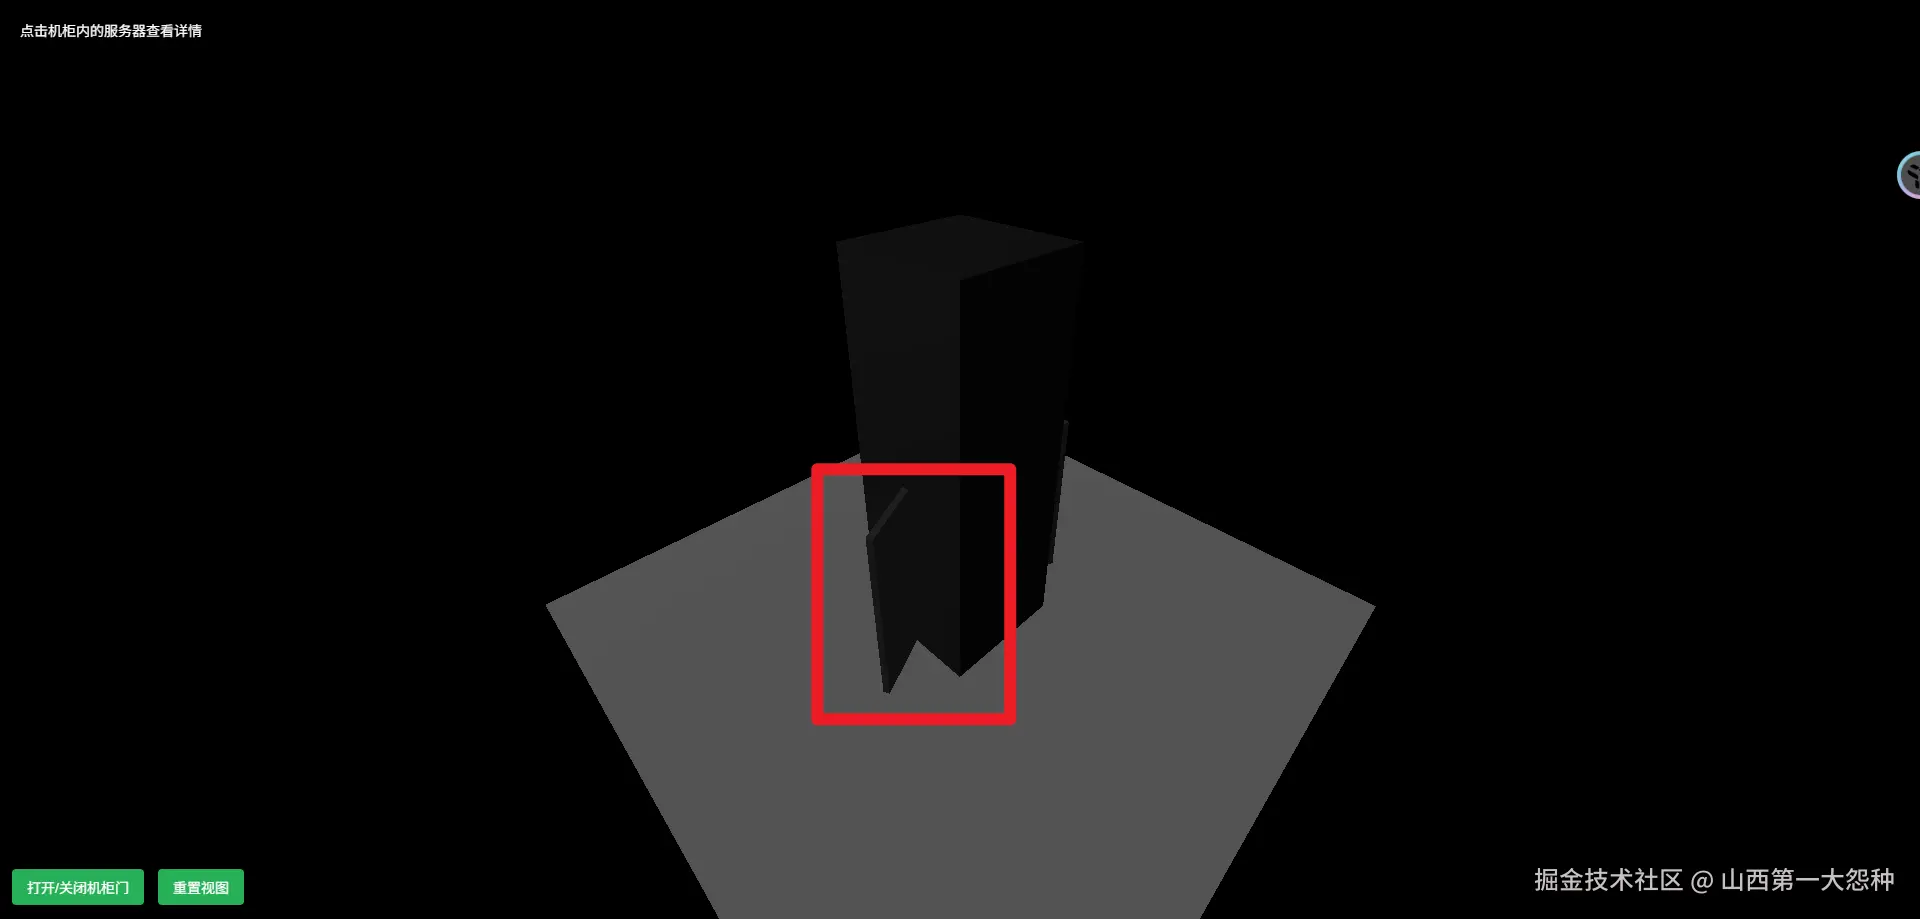
11:00 AM - 血压升高现场
看着AI生成的"未来科技风"机柜,我深吸一口气,决定亲自下场。毕竟,程序员最后的尊严就是——"还是自己来吧"。
11:30 AM - 手动抢救
首先手动创建一个空场景吧
class SceneManager {
constructor() {
this.scene = new THREE.Scene();
this.camera = new THREE.PerspectiveCamera(
75,
window.innerWidth / window.innerHeight,
0.1,
1000

    );
this.camera.position.set(0, 2, 5);

this.renderer = new THREE.WebGLRenderer();
this.renderer.setSize(window.innerWidth, window.innerHeight);
const canvas = document.getElementById('renderCanvas');

    canvas.appendChild(this.renderer.domElement);

this.controls = new OrbitControls(this.camera, this.renderer.domElement);
this.controls.enableDamping = true;
this.controls.dampingFactor = 0.05;
this.controls.target.set(0, 3, 0);
this.controls.update();

this.addLights();
this.addFloor();

  }

addLights() {
const ambientLight = new THREE.AmbientLight(0xffffff, 0.5);
this.scene.add(ambientLight);

const directionalLight = new THREE.DirectionalLight(0xffffff, 1);

    directionalLight.position.set(5, 5, 5);
this.scene.add(directionalLight);

  }

addFloor() {
const floorGeometry = new THREE.PlaneGeometry(10, 10);
const floorMaterial = new THREE.MeshStandardMaterial({ color: 0x888888 });
const floor = new THREE.Mesh(floorGeometry, floorMaterial);

    floor.rotation.x = -Math.PI / 2;
this.scene.add(floor);

  }

animate() {
const animateLoop = () => {
requestAnimationFrame(animateLoop);
this.controls.update();
this.renderer.render(this.scene, this.camera);

    };
animateLoop();

  }

onResize() {
window.addEventListener('resize', () => {
this.camera.aspect = window.innerWidth / window.innerHeight;
this.camera.updateProjectionMatrix();
this.renderer.setSize(window.innerWidth, window.innerHeight);

    });

  }

}
然后这机柜怎么画呢,不管了,先去吃个饭,天大地大肚子最大
12:30 PM - 程序员的能量补给时刻
淦!先干饭!" 我一把推开键盘,决定暂时逃离这个三维世界。毕竟——
- 饥饿值已经降到30%以下
- 右手开始不受控制地颤抖
- 看Three.js文档出现了重影
扒饭间隙,手机突然震动。产品经理发来消息:"那个3D机柜..."
我差点被饭粒呛到,赶紧回复:"正在深度优化用户体验!"
(十分钟风卷残云后)
1:00 PM - 回归正题
吃饱喝足,终于可以专心搞机柜了,(此处可怜一下我的午休)
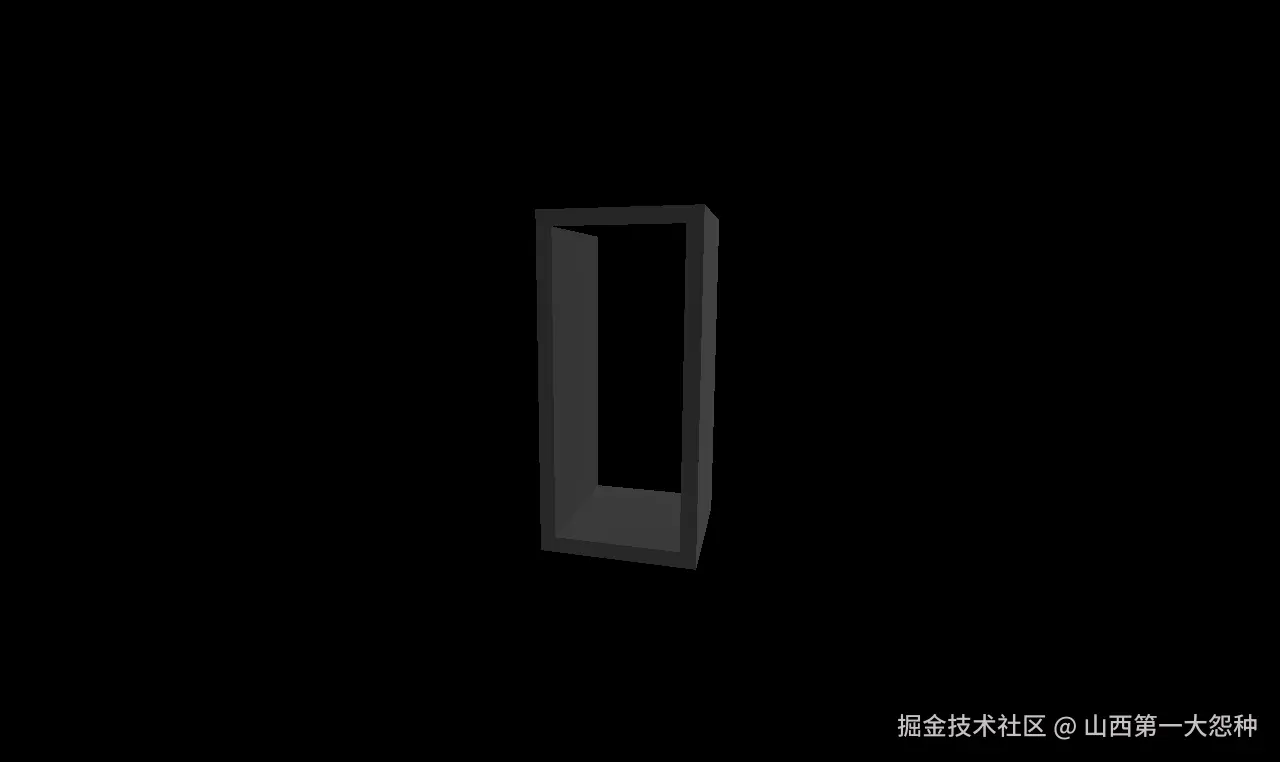
拆分机柜结构
机柜的结构可以分为以下几个部分:
- 不可操作结构:
- 底部:承载整个机柜的重量,通常是一个坚固的平面。
- 顶部:封闭机柜的顶部,提供额外的支撑。
- 左侧和右侧:机柜的侧板,通常是固定的,用于保护内部设备。
- 可操作结构:
- 前门:单门设计,通常是透明或半透明材质,便于观察内部设备。
- 后门:双开门设计,方便从后方接入设备的电缆和接口。
实现步骤
- 创建不可操作结构:
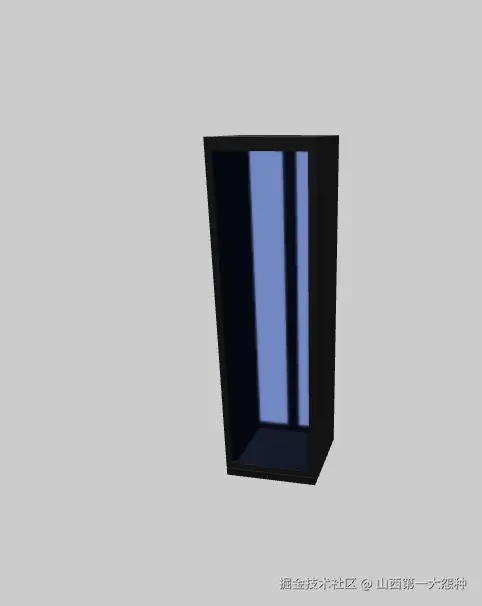
使用BoxGeometry创建底部、顶部、左侧和右侧的平面,并将它们组合成一个整体。 - 添加前门:
前门使用透明材质,并设置旋转轴以实现开门动画。 - 添加后门:
后门分为左右两部分,分别设置旋转轴以实现双开门效果。 - 优化细节:
- 添加螺丝孔和通风口。
- 使用高光材质提升视觉效果。
接下来,我们开始用代码实现这些结构。
机柜结构的实现
1. 创建不可操作结构
底部
export function createCabinetBase(scene) {
const geometry = new THREE.BoxGeometry(0.6,  0.05, 0.64);
const base = new THREE.Mesh(geometry,  materials.baseMaterial);

  base.position.y = -0.05; // 调整位置

  scene.add(base);

}
底部使用BoxGeometry创建,设置了深灰色金属材质,位置调整为机柜的最底部。
顶部
export function createCabinetTop(scene) {
const geometry = new THREE.BoxGeometry(0.6, 0.05,  0.64);
const top = new THREE.Mesh(geometry, materials.baseMaterial);

  top.position.y = 1.95; // 调整位置

  scene.add(top);

}
顶部与底部类似,位置调整为机柜的最顶部。
侧面
export function createCabinetSides(scene) {
const geometry = new THREE.BoxGeometry(0.04, 2, 0.6);
const material = materials.baseMaterial;
// 左侧面
const leftSide = new THREE.Mesh(geometry, material);

  leftSide.position.set(-0.28, 0.95, 0); // 调整位置

  scene.add(leftSide);
// 右侧面
const rightSide = new THREE.Mesh(geometry, material);

  rightSide.position.set(0.28, 0.95, 0); // 调整位置

  scene.add(rightSide);

}
侧面使用两个BoxGeometry分别创建左侧和右侧,位置对称分布。
2. 创建可操作结构
前门
export function createCabinetFrontDoor(scene) {
const doorGr0up = new THREE.Gr0up();
const doorWidth = 0.04;
const doorHeight = 2;
const doorDepth = 0.6;

const frameMaterial = materials.baseMaterial;
const frameThickness = 0.04;

// 上边框
const topFrameGeo = new THREE.BoxGeometry(doorWidth, frameThickness, doorDepth);
const topFrame = new THREE.Mesh(topFrameGeo, frameMaterial);

    topFrame.position.set(0, 1 - frameThickness / 2, 0);

    doorGr0up.add(topFrame);

// 下边框
const bottomFrameGeo = new THREE.BoxGeometry(doorWidth, frameThickness, doorDepth);
const bottomFrame = new THREE.Mesh(bottomFrameGeo, frameMaterial);

    bottomFrame.position.set(0, -doorHeight / 2 + 0.05, 0);

    doorGr0up.add(bottomFrame);

// 左右边框
const leftFrameGeo = new THREE.BoxGeometry(doorWidth, doorHeight - 2 * frameThickness, frameThickness);
const leftFrame = new THREE.Mesh(leftFrameGeo, frameMaterial);

    leftFrame.position.set(0, 1 - doorHeight / 2, -doorDepth / 2 + frameThickness / 2);

    doorGr0up.add(leftFrame);

const rightFrameGeo = new THREE.BoxGeometry(doorWidth, doorHeight - 2 * frameThickness, frameThickness);
const rightFrame = new THREE.Mesh(rightFrameGeo, frameMaterial);

    rightFrame.position.set(0, 1 - doorHeight / 2, doorDepth / 2 - frameThickness / 2);

    doorGr0up.add(rightFrame);


    scene.add(doorGr0up);
return doorGr0up;

}
前门由一个Gr0up组装而成,包含上下左右边框,材质与机柜一致,后续将添加玻璃部分和动画。
前门动画的实现
前门的动画使用gsap库实现,设置旋转轴为左侧边框。
    gsap.to(frontDoor.rotation, {
y: Math.PI / 2, // 90度旋转
duration: 1,   // 动画时长
ease: "power2.inOut",

    });
通过gsap.to方法,前门可以实现平滑的开门效果。
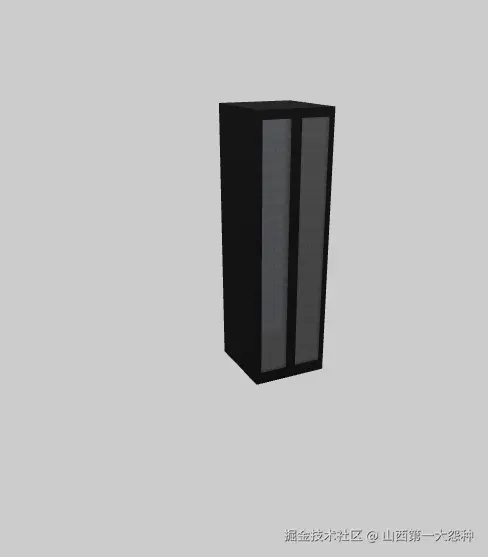
3. 添加后门
后门采用双开设计,左右两扇门分别由多个边框组成,并通过Gr0up进行组合。
为了优化细节我还加入了网孔结构(此处心疼一下我为写他掉的头发)
后门的实现
export function createCabinetBackDoor(scene) {
const doorGr0up = new THREE.Gr0up();
const doorWidth = 0.04;
const doorHeight = 2;
const doorDepth = 0.6;
const singleDoorDepth = doorDepth / 2;
const frameMaterial = materials.baseMaterial;
const frameThickness = 0.04;

function createSingleBackDoor(isLeft) {
const singleGr0up = new THREE.Gr0up();

// 上边框
const topFrameGeo = new THREE.BoxGeometry(doorWidth, frameThickness, singleDoorDepth);
const topFrame = new THREE.Mesh(topFrameGeo, frameMaterial);

        topFrame.position.set(0, 1 - frameThickness / 2, 0);

        singleGr0up.add(topFrame);

// 下边框
const bottomFrameGeo = new THREE.BoxGeometry(doorWidth, frameThickness, singleDoorDepth);
const bottomFrame = new THREE.Mesh(bottomFrameGeo, frameMaterial);

        bottomFrame.position.set(0, -doorHeight / 2 + 0.05, 0);

        singleGr0up.add(bottomFrame);

// 外侧边框
const sideFrameGeo = new THREE.BoxGeometry(doorWidth, doorHeight - 2 * frameThickness, frameThickness);
const sideFrame = new THREE.Mesh(sideFrameGeo, frameMaterial);

        sideFrame.position.set(
0,
1 - doorHeight / 2,

            isLeft

                ? -singleDoorDepth / 2 + frameThickness / 2

                : singleDoorDepth / 2 - frameThickness / 2

        );

        singleGr0up.add(sideFrame);

return singleGr0up;

    }

const leftDoor = createSingleBackDoor(true);
const rightDoor = createSingleBackDoor(false);


    doorGr0up.add(leftDoor);

    doorGr0up.add(rightDoor);

    scene.add(doorGr0up);

return { group: doorGr0up, leftDoor, rightDoor };

}
后门的实现与前门类似,采用双扇门设计,左右各一扇。
后门动画的实现
后门的动画同样使用gsap库实现,分别设置左右门的旋转轴。
 gsap.to(leftDoor.rotation, {
y: Math.PI / 2, // 左门向外旋转90度
duration: 1,
ease: "power2.inOut",

    });


    gsap.to(rightDoor.rotation, {
y: -Math.PI / 2, // 右门向外旋转90度
duration: 1,
ease: "power2.inOut",

    });
通过gsap.to方法,后门可以实现平滑的双开效果。

2:00 PM - 项目收尾
终于,随着最后一行代码的敲定,3D机柜模型在屏幕上完美呈现。前门优雅地打开,后门平滑地双开,仿佛在向我点头致意。
我靠在椅背上,长舒一口气,心中默念:"果然,程序员的尊严还是要靠自己守护。"
可拓展功能
虽然当前的3D机柜模型已经实现了基本的展示和交互功能,但在实际项目中,我们可以进一步扩展以下功能:
1. U位标记
2. U位资产管理
3. 动态灯光效果
4. 数据联动
将3D机柜与后台数据联动:
- 实时更新设备状态。
- 显示设备的实时监控数据(如温度、功耗等)。
- 支持通过API接口获取和更新设备信息。
不说了,需求又来了()我还是继续去搬砖了
代码地址:gitee.com/erhadong/th…
来源:juejin.cn/post/7516784123703181322
