因为 Diff 算法,计算的就是虚拟 DOM 的差异,所以先铺垫一点点虚拟 DOM,了解一下其结构,再来一层层揭开 Diff 算法的面纱,深入浅出,助你彻底弄懂 Diff 算法原理
认识虚拟 DOM
虚拟 DOM 简单说就是 用JS对象来模拟 DOM 结构
那它是怎么用 JS 对象模拟 DOM 结构的呢?看个例子
<template>
<div id="app" class="container">
<h1>沐华</h1>
</div>
</template>
上面的模板转在虚拟 DOM 就是下面这样的
{
'div',
props:{ id:'app', class:'container' },
children: [
{ tag: 'h1', children:'沐华' }
]
}
这样的 DOM 结构就称之为 虚拟 DOM (Virtual Node),简称 vnode。
它的表达方式就是把每一个标签都转为一个对象,这个对象可以有三个属性:tag、props、children
- tag:必选。就是标签。也可以是组件,或者函数
- props:非必选。就是这个标签上的属性和方法
- children:非必选。就是这个标签的内容或者子节点,如果是文本节点就是字符串,如果有子节点就是数组。换句话说 如果判断 children 是字符串的话,就表示一定是文本节点,这个节点肯定没有子元素
为什么要使用虚拟 DOM 呢? 看个图

如图可以看出原生 DOM 有非常多的属性和事件,就算是创建一个空div也要付出不小的代价。而使用虚拟 DOM 来提升性能的点在于 DOM 发生变化的时候,通过 diff 算法和数据改变前的 DOM 对比,计算出需要更改的 DOM,然后只对变化的 DOM 进行操作,而不是更新整个视图
在 Vue 中是怎么把 DOM 转成上面这样的虚拟 DOM 的呢,有兴趣的可以关注我另一篇文章详细了解一下 Vue 中的模板编译过程和原理
在 Vue 里虚拟 DOM 的数据更新机制采用的是异步更新队列,就是把变更后的数据变装入一个数据更新的异步队列,就是 patch,用它来做新老 vnode 对比
认识 Diff 算法
Diff 算法,在 Vue 里面就是叫做 patch ,它的核心就是参考 Snabbdom,通过新旧虚拟 DOM 对比(即 patch 过程),找出最小变化的地方转为进行 DOM 操作
扩展
在 Vue1 里是没有 patch 的,每个依赖都有单独的 Watcher 负责更新,当项目规模变大的时候性能就跟不上了,所以在 Vue2 里为了提升性能,改为每个组件只有一个 Watcher,那我们需要更新的时候,怎么才能精确找到组件里发生变化的位置呢?所以 patch 它来了
那么它是在什么时候执行的呢?
在页面首次渲染的时候会调用一次 patch 并创建新的 vnode,不会进行更深层次的比较
然后是在组件中数据发生变化时,会触发 setter 然后通过 Notify 通知 Watcher,对应的 Watcher 会通知更新并执行更新函数,它会执行 render 函数获取新的虚拟 DOM,然后执行 patch 对比上次渲染结果的老的虚拟 DOM,并计算出最小的变化,然后再去根据这个最小的变化去更新真实的 DOM,也就是视图
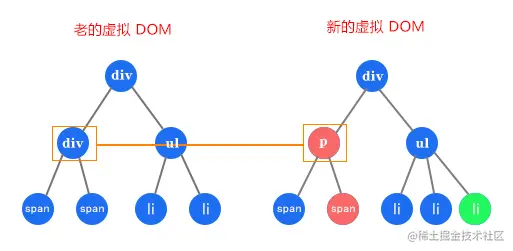
那么它是怎么计算的? 先看个图
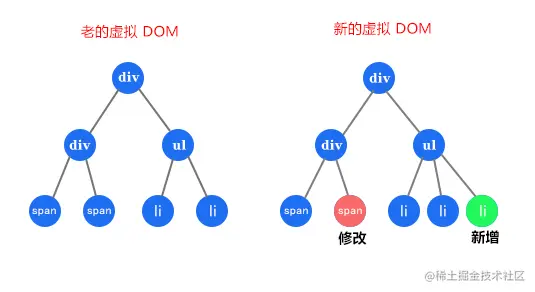
比如有上图这样的 DOM 结构,是怎么计算出变化?简单说就是
- 遍历老的虚拟 DOM
- 遍历新的虚拟 DOM
- 然后根据变化,比如上面的改变和新增,再重新排序
可是这样会有很大问题,假如有1000个节点,就需要计算 1000³ 次,也就是10亿次,这样是无法让人接受的,所以 Vue 或者 React 里使用 Diff 算法的时候都遵循深度优先,同层比较的策略做了一些优化,来计算出最小变化
Diff 算法的优化
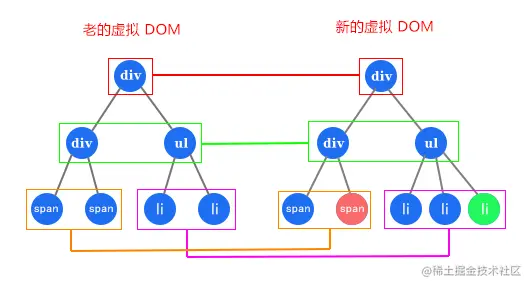
1. 只比较同一层级,不跨级比较
如图,Diff 过程只会把同颜色框起来的同一层级的 DOM 进行比较,这样来简化比较次数,这是第一个方面
2. 比较标签名
如果同一层级的比较标签名不同,就直接移除老的虚拟 DOM 对应的节点,不继续按这个树状结构做深度比较,这是简化比较次数的第二个方面
3. 比较 key
如果标签名相同,key 也相同,就会认为是相同节点,也不继续按这个树状结构做深度比较,比如我们写 v-for 的时候会比较 key,不写 key 就会报错,这也就是因为 Diff 算法需要比较 key
面试中有一道特别常见的题,就是让你说一下 key 的作用,实际上考查的就是大家对虚拟 DOM 和 patch 细节的掌握程度,能够反应出我们面试者的理解层次,所以这里扩展一下 key
key 的作用
比如有一个列表,我们需要在中间插入一个元素,会发生什么变化呢?先看个图
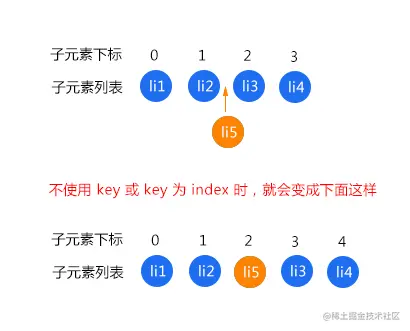
如图的 li1 和 li2 不会重新渲染,这个没有争议的。而 li3、li4、li5 都会重新渲染
因为在不使用 key 或者列表的 index 作为 key 的时候,每个元素对应的位置关系都是 index,上图中的结果直接导致我们插入的元素到后面的全部元素,对应的位置关系都发生了变更,所以全部都会执行更新操作,这可不是我们想要的,我们希望的是渲染添加的那一个元素,其他四个元素不做任何变更,也就不要重新渲染
而在使用唯一 key 的情况下,每个元素对应的位置关系就是 key,来看一下使用唯一 key 值的情况下
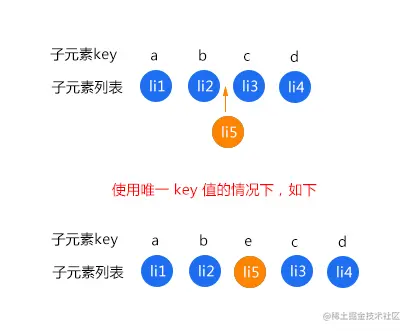
这样如图中的 li3 和 li4 就不会重新渲染,因为元素内容没发生改变,对应的位置关系也没有发生改变。
这也是为什么 v-for 必须要写 key,而且不建议开发中使用数组的 index 作为 key 的原因
总结一下:
- key 的作用主要是为了更高效的更新虚拟 DOM,因为它可以非常精确的找到相同节点,因此 patch 过程会非常高效
- Vue 在 patch 过程中会判断两个节点是不是相同节点时,key 是一个必要条件。比如渲染列表时,如果不写 key,Vue 在比较的时候,就可能会导致频繁更新元素,使整个 patch 过程比较低效,影响性能
- 应该避免使用数组下标作为 key,因为 key 值不是唯一的话可能会导致上面图中表示的 bug,使 Vue 无法区分它他,还有比如在使用相同标签元素过渡切换的时候,就会导致只替换其内部属性而不会触发过渡效果
- 从源码里可以知道,Vue 判断两个节点是否相同时主要判断两者的元素类型和 key 等,如果不设置 key,就可能永远认为这两个是相同节点,只能去做更新操作,就造成大量不必要的 DOM 更新操作,明显是不可取的
有兴趣的可以去看一下源码:src\core\vdom\patch.js -35行 sameVnode(),下面也有详细介绍
Diff 算法核心原理——源码
上面说了Diff 算法,在 Vue 里面就是 patch,铺垫了这么多,下面进入源码里看一下这个神乎其神的 patch 干了啥?
patch
其实 patch 就是一个函数,我们先介绍一下源码里的核心流程,再来看一下 patch 的源码,源码里每一行也有注释
它可以接收四个参数,主要还是前两个
- oldVnode:老的虚拟 DOM 节点
- vnode:新的虚拟 DOM 节点
- hydrating:是不是要和真实 DOM 混合,服务端渲染的话会用到,这里不过多说明
- removeOnly:transition-group 会用到,这里不过多说明
主要流程是这样的:
- vnode 不存在,oldVnode 存在,就删掉 oldVnode
- vnode 存在,oldVnode 不存在,就创建 vnode
- 两个都存在的话,通过 sameVnode 函数(后面有详解)对比是不是同一节点
- 如果是同一节点的话,通过 patchVnode 进行后续对比节点文本变化或子节点变化
- 如果不是同一节点,就把 vnode 挂载到 oldVnode 的父元素下
- 如果组件的根节点被替换,就遍历更新父节点,然后删掉旧的节点
- 如果是服务端渲染就用 hydrating 把 oldVnode 和真实 DOM 混合
下面看完整的 patch 函数源码,说明我都写在注释里了
源码地址:src\core\vdom\patch.js -700行
// 两个判断函数
function isUndef (v: any): boolean %checks {
return v === undefined || v === null
}
function isDef (v: any): boolean %checks {
return v !== undefined && v !== null
}
return function patch (oldVnode, vnode, hydrating, removeOnly) {
// 如果新的 vnode 不存在,但是 oldVnode 存在
if (isUndef(vnode)) {
// 如果 oldVnode 存在,调用 oldVnode 的组件卸载钩子 destroy
if (isDef(oldVnode)) invokeDestroyHook(oldVnode)
return
}
let isInitialPatch = false
const insertedVnodeQueue = []
// 如果 oldVnode 不存在的话,新的 vnode 是肯定存在的,比如首次渲染的时候
if (isUndef(oldVnode)) {
isInitialPatch = true
// 就创建新的 vnode
createElm(vnode, insertedVnodeQueue)
} else {
// 剩下的都是新的 vnode 和 oldVnode 都存在的话
// 是不是元素节点
const isRealElement = isDef(oldVnode.nodeType)
// 是元素节点 && 通过 sameVnode 对比是不是同一个节点 (函数后面有详解)
if (!isRealElement && sameVnode(oldVnode, vnode)) {
// 如果是 就用 patchVnode 进行后续对比 (函数后面有详解)
patchVnode(oldVnode, vnode, insertedVnodeQueue, null, null, removeOnly)
} else {
// 如果不是同一元素节点的话
if (isRealElement) {
// const SSR_ATTR = 'data-server-rendered'
// 如果是元素节点 并且有 'data-server-rendered' 这个属性
if (oldVnode.nodeType === 1 && oldVnode.hasAttribute(SSR_ATTR)) {
// 就是服务端渲染的,删掉这个属性
oldVnode.removeAttribute(SSR_ATTR)
hydrating = true
}
// 这个判断里是服务端渲染的处理逻辑,就是混合
if (isTrue(hydrating)) {
if (hydrate(oldVnode, vnode, insertedVnodeQueue)) {
invokeInsertHook(vnode, insertedVnodeQueue, true)
return oldVnode
} else if (process.env.NODE_ENV !== 'production') {
warn('这是一段很长的警告信息')
}
}
// function emptyNodeAt (elm) {
// return new VNode(nodeOps.tagName(elm).toLowerCase(), {}, [], undefined, elm)
// }
// 如果不是服务端渲染的,或者混合失败,就创建一个空的注释节点替换 oldVnode
oldVnode = emptyNodeAt(oldVnode)
}
// 拿到 oldVnode 的父节点
const oldElm = oldVnode.elm
const parentElm = nodeOps.parentNode(oldElm)
// 根据新的 vnode 创建一个 DOM 节点,挂载到父节点上
createElm(
vnode,
insertedVnodeQueue,
oldElm._leaveCb ? null : parentElm,
nodeOps.nextSibling(oldElm)
)
// 如果新的 vnode 的根节点存在,就是说根节点被修改了,就需要遍历更新父节点
if (isDef(vnode.parent)) {
let ancestor = vnode.parent
const patchable = isPatchable(vnode)
// 递归更新父节点下的元素
while (ancestor) {
// 卸载老根节点下的全部组件
for (let i = 0; i < cbs.destroy.length; ++i) {
cbs.destroy[i](ancestor)
}
// 替换现有元素
ancestor.elm = vnode.elm
if (patchable) {
for (let i = 0; i < cbs.create.length; ++i) {
cbs.create[i](emptyNode, ancestor)
}
const insert = ancestor.data.hook.insert
if (insert.merged) {
for (let i = 1; i < insert.fns.length; i++) {
insert.fns[i]()
}
}
} else {
registerRef(ancestor)
}
// 更新父节点
ancestor = ancestor.parent
}
}
// 如果旧节点还存在,就删掉旧节点
if (isDef(parentElm)) {
removeVnodes([oldVnode], 0, 0)
} else if (isDef(oldVnode.tag)) {
// 否则直接卸载 oldVnode
invokeDestroyHook(oldVnode)
}
}
}
// 返回更新后的节点
invokeInsertHook(vnode, insertedVnodeQueue, isInitialPatch)
return vnode.elm
}
sameVnode
这个是用来判断是不是同一节点的函数
这个函数不长,直接看源码吧
源码地址:src\core\vdom\patch.js -35行
function sameVnode (a, b) {
return (
a.key === b.key && // key 是不是一样
a.asyncFactory === b.asyncFactory && ( // 是不是异步组件
(
a.tag === b.tag && // 标签是不是一样
a.isComment === b.isComment && // 是不是注释节点
isDef(a.data) === isDef(b.data) && // 内容数据是不是一样
sameInputType(a, b) // 判断 input 的 type 是不是一样
) || (
isTrue(a.isAsyncPlaceholder) && // 判断区分异步组件的占位符否存在
isUndef(b.asyncFactory.error)
)
)
)
}
patchVnode
源码地址:src\core\vdom\patch.js -501行
这个是在新的 vnode 和 oldVnode 是同一节点的情况下,才会执行的函数,主要是对比节点文本变化或子节点变化
还是先介绍一下主要流程,再看源码吧,流程是这样的:
- 如果 oldVnode 和 vnode 的引用地址是一样的,就表示节点没有变化,直接返回
- 如果 oldVnode 的 isAsyncPlaceholder 存在,就跳过异步组件的检查,直接返回
- 如果 oldVnode 和 vnode 都是静态节点,并且有一样的 key,并且 vnode 是克隆节点或者 v-once 指令控制的节点时,把 oldVnode.elm 和 oldVnode.child 都复制到 vnode 上,然后返回
- 如果 vnode 不是文本节点也不是注释的情况下
- 如果 vnode 和 oldVnode 都有子节点,而且子节点不一样的话,就调用 updateChildren 更新子节点
- 如果只有 vnode 有子节点,就调用 addVnodes 创建子节点
- 如果只有 oldVnode 有子节点,就调用 removeVnodes 删除该子节点
- 如果 vnode 文本为 undefined,就删掉 vnode.elm 文本
- 如果 vnode 是文本节点但是和 oldVnode 文本内容不一样,就更新文本
function patchVnode (
oldVnode, // 老的虚拟 DOM 节点
vnode, // 新的虚拟 DOM 节点
insertedVnodeQueue, // 插入节点的队列
ownerArray, // 节点数组
index, // 当前节点的下标
removeOnly // 只有在
) {
// 新老节点引用地址是一样的,直接返回
// 比如 props 没有改变的时候,子组件就不做渲染,直接复用
if (oldVnode === vnode) return
// 新的 vnode 真实的 DOM 元素
if (isDef(vnode.elm) && isDef(ownerArray)) {
// clone reused vnode
vnode = ownerArray[index] = cloneVNode(vnode)
}
const elm = vnode.elm = oldVnode.elm
// 如果当前节点是注释或 v-if 的,或者是异步函数,就跳过检查异步组件
if (isTrue(oldVnode.isAsyncPlaceholder)) {
if (isDef(vnode.asyncFactory.resolved)) {
hydrate(oldVnode.elm, vnode, insertedVnodeQueue)
} else {
vnode.isAsyncPlaceholder = true
}
return
}
// 当前节点是静态节点的时候,key 也一样,或者有 v-once 的时候,就直接赋值返回
if (isTrue(vnode.isStatic) &&
isTrue(oldVnode.isStatic) &&
vnode.key === oldVnode.key &&
(isTrue(vnode.isCloned) || isTrue(vnode.isOnce))
) {
vnode.componentInstance = oldVnode.componentInstance
return
}
// hook 相关的不用管
let i
const data = vnode.data
if (isDef(data) && isDef(i = data.hook) && isDef(i = i.prepatch)) {
i(oldVnode, vnode)
}
// 获取子元素列表
const oldCh = oldVnode.children
const ch = vnode.children
if (isDef(data) && isPatchable(vnode)) {
// 遍历调用 update 更新 oldVnode 所有属性,比如 class,style,attrs,domProps,events...
// 这里的 update 钩子函数是 vnode 本身的钩子函数
for (i = 0; i < cbs.update.length; ++i) cbs.update[i](oldVnode, vnode)
// 这里的 update 钩子函数是我们传过来的函数
if (isDef(i = data.hook) && isDef(i = i.update)) i(oldVnode, vnode)
}
// 如果新节点不是文本节点,也就是说有子节点
if (isUndef(vnode.text)) {
// 如果新老节点都有子节点
if (isDef(oldCh) && isDef(ch)) {
// 如果新老节点的子节点不一样,就执行 updateChildren 函数,对比子节点
if (oldCh !== ch) updateChildren(elm, oldCh, ch, insertedVnodeQueue, removeOnly)
} else if (isDef(ch)) {
// 如果新节点有子节点的话,就是说老节点没有子节点
// 如果老节点文本节点,就是说没有子节点,就清空
if (isDef(oldVnode.text)) nodeOps.setTextContent(elm, '')
// 添加子节点
addVnodes(elm, null, ch, 0, ch.length - 1, insertedVnodeQueue)
} else if (isDef(oldCh)) {
// 如果新节点没有子节点,老节点有子节点,就删除
removeVnodes(oldCh, 0, oldCh.length - 1)
} else if (isDef(oldVnode.text)) {
// 如果老节点是文本节点,就清空
nodeOps.setTextContent(elm, '')
}
} else if (oldVnode.text !== vnode.text) {
// 新老节点都是文本节点,且文本不一样,就更新文本
nodeOps.setTextContent(elm, vnode.text)
}
if (isDef(data)) {
// 执行 postpatch 钩子
if (isDef(i = data.hook) && isDef(i = i.postpatch)) i(oldVnode, vnode)
}
}
updateChildren
源码地址:src\core\vdom\patch.js -404行
这个是新的 vnode 和 oldVnode 都有子节点,且子节点不一样的时候进行对比子节点的函数
这里很关键,很关键!
比如现在有两个子节点列表对比,对比主要流程如下
循环遍历两个列表,循环停止条件是:其中一个列表的开始指针 startIdx 和 结束指针 endIdx 重合
循环内容是:{
- 新的头和老的头对比
- 新的尾和老的尾对比
- 新的头和老的尾对比
- 新的尾和老的头对比。 这四种对比如图
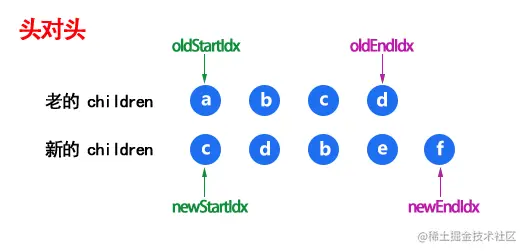
以上四种只要有一种判断相等,就调用 patchVnode 对比节点文本变化或子节点变化,然后移动对比的下标,继续下一轮循环对比
如果以上四种情况都没有命中,就不断拿新的开始节点的 key 去老的 children 里找
- 如果没找到,就创建一个新的节点
- 如果找到了,再对比标签是不是同一个节点
- 如果是同一个节点,就调用 patchVnode 进行后续对比,然后把这个节点插入到老的开始前面,并且移动新的开始下标,继续下一轮循环对比
- 如果不是相同节点,就创建一个新的节点
}
- 如果老的 vnode 先遍历完,就添加新的 vnode 没有遍历的节点
- 如果新的 vnode 先遍历完,就删除老的 vnode 没有遍历的节点
为什么会有头对尾,尾对头的操作?
因为可以快速检测出 reverse 操作,加快 Diff 效率
function updateChildren (parentElm, oldCh, newCh, insertedVnodeQueue, removeOnly) {
let oldStartIdx = 0 // 老 vnode 遍历的下标
let newStartIdx = 0 // 新 vnode 遍历的下标
let oldEndIdx = oldCh.length - 1 // 老 vnode 列表长度
let oldStartVnode = oldCh[0] // 老 vnode 列表第一个子元素
let oldEndVnode = oldCh[oldEndIdx] // 老 vnode 列表最后一个子元素
let newEndIdx = newCh.length - 1 // 新 vnode 列表长度
let newStartVnode = newCh[0] // 新 vnode 列表第一个子元素
let newEndVnode = newCh[newEndIdx] // 新 vnode 列表最后一个子元素
let oldKeyToIdx, idxInOld, vnodeToMove, refElm
const canMove = !removeOnly
// 循环,规则是开始指针向右移动,结束指针向左移动移动
// 当开始和结束的指针重合的时候就结束循环
while (oldStartIdx <= oldEndIdx && newStartIdx <= newEndIdx) {
if (isUndef(oldStartVnode)) {
oldStartVnode = oldCh[++oldStartIdx] // Vnode has been moved left
} else if (isUndef(oldEndVnode)) {
oldEndVnode = oldCh[--oldEndIdx]
// 老开始和新开始对比
} else if (sameVnode(oldStartVnode, newStartVnode)) {
// 是同一节点 递归调用 继续对比这两个节点的内容和子节点
patchVnode(oldStartVnode, newStartVnode, insertedVnodeQueue, newCh, newStartIdx)
// 然后把指针后移一位,从前往后依次对比
// 比如第一次对比两个列表的[0],然后比[1]...,后面同理
oldStartVnode = oldCh[++oldStartIdx]
newStartVnode = newCh[++newStartIdx]
// 老结束和新结束对比
} else if (sameVnode(oldEndVnode, newEndVnode)) {
patchVnode(oldEndVnode, newEndVnode, insertedVnodeQueue, newCh, newEndIdx)
// 然后把指针前移一位,从后往前比
oldEndVnode = oldCh[--oldEndIdx]
newEndVnode = newCh[--newEndIdx]
// 老开始和新结束对比
} else if (sameVnode(oldStartVnode, newEndVnode)) { // Vnode moved right
patchVnode(oldStartVnode, newEndVnode, insertedVnodeQueue, newCh, newEndIdx)
canMove && nodeOps.insertBefore(parentElm, oldStartVnode.elm, nodeOps.nextSibling(oldEndVnode.elm))
// 老的列表从前往后取值,新的列表从后往前取值,然后对比
oldStartVnode = oldCh[++oldStartIdx]
newEndVnode = newCh[--newEndIdx]
// 老结束和新开始对比
} else if (sameVnode(oldEndVnode, newStartVnode)) { // Vnode moved left
patchVnode(oldEndVnode, newStartVnode, insertedVnodeQueue, newCh, newStartIdx)
canMove && nodeOps.insertBefore(parentElm, oldEndVnode.elm, oldStartVnode.elm)
// 老的列表从后往前取值,新的列表从前往后取值,然后对比
oldEndVnode = oldCh[--oldEndIdx]
newStartVnode = newCh[++newStartIdx]
// 以上四种情况都没有命中的情况
} else {
if (isUndef(oldKeyToIdx)) oldKeyToIdx = createKeyToOldIdx(oldCh, oldStartIdx, oldEndIdx)
// 拿到新开始的 key,在老的 children 里去找有没有某个节点有这个 key
idxInOld = isDef(newStartVnode.key)
? oldKeyToIdx[newStartVnode.key]
: findIdxInOld(newStartVnode, oldCh, oldStartIdx, oldEndIdx)
// 新的 children 里有,可是没有在老的 children 里找到对应的元素
if (isUndef(idxInOld)) {
/// 就创建新的元素
createElm(newStartVnode, insertedVnodeQueue, parentElm, oldStartVnode.elm, false, newCh, newStartIdx)
} else {
// 在老的 children 里找到了对应的元素
vnodeToMove = oldCh[idxInOld]
// 判断标签如果是一样的
if (sameVnode(vnodeToMove, newStartVnode)) {
// 就把两个相同的节点做一个更新
patchVnode(vnodeToMove, newStartVnode, insertedVnodeQueue, newCh, newStartIdx)
oldCh[idxInOld] = undefined
canMove && nodeOps.insertBefore(parentElm, vnodeToMove.elm, oldStartVnode.elm)
} else {
// 如果标签是不一样的,就创建新的元素
createElm(newStartVnode, insertedVnodeQueue, parentElm, oldStartVnode.elm, false, newCh, newStartIdx)
}
}
newStartVnode = newCh[++newStartIdx]
}
}
// oldStartIdx > oldEndIdx 说明老的 vnode 先遍历完
if (oldStartIdx > oldEndIdx) {
// 就添加从 newStartIdx 到 newEndIdx 之间的节点
refElm = isUndef(newCh[newEndIdx + 1]) ? null : newCh[newEndIdx + 1].elm
addVnodes(parentElm, refElm, newCh, newStartIdx, newEndIdx, insertedVnodeQueue)
// 否则就说明新的 vnode 先遍历完
} else if (newStartIdx > newEndIdx) {
// 就删除掉老的 vnode 里没有遍历的节点
removeVnodes(oldCh, oldStartIdx, oldEndIdx)
}
}
至此,整个 Diff 流程的核心逻辑源码到这就结束了,再来看一下 Vue 3 里做了哪些改变吧
Vue3 的优化
本文源码版本是 Vue2 的,在 Vue3 里整个重写了 Diff 算法这一块东西,所以源码的话可以说基本是完全不一样的,但是要做的事还是一样的
关于 Vue3 的 Diff 完整源码解析还在撰稿中,过几天就发布了,这里先介绍一下相比 Vue2 优化的部分,尤大公布的数据就是 update 性能提升了 1.3~2 倍,ssr 性能提升了 2~3 倍,来看看都有哪些优化
- 事件缓存:将事件缓存,可以理解为变成静态的了
- 添加静态标记:Vue2 是全量 Diff,Vue3 是静态标记 + 非全量 Diff
- 静态提升:创建静态节点时保存,后续直接复用
- 使用最长递增子序列优化了对比流程:Vue2 里在 updateChildren() 函数里对比变更,在 Vue3 里这一块的逻辑主要在 patchKeyedChildren() 函数里,具体看下面
事件缓存
比如这样一个有点击事件的按钮
<button @click="handleClick">按钮</button>
来看下在 Vue3 被编译后的结果
export function render(_ctx, _cache, $props, $setup, $data, $options) {
return (_openBlock(), _createElementBlock("button", {
onClick: _cache[0] || (_cache[0] = (...args) => (_ctx.handleClick && _ctx.handleClick(...args)))
}, "按钮"))
}
注意看,onClick 会先读取缓存,如果缓存没有的话,就把传入的事件存到缓存里,都可以理解为变成静态节点了,优秀吧,而在 Vue2 中就没有缓存,就是动态的
静态标记
看一下静态标记是啥?
源码地址:packages/shared/src/patchFlags.ts
export const enum PatchFlags {
TEXT = 1 , // 动态文本节点
CLASS = 1 << 1, // 2 动态class
STYLE = 1 << 2, // 4 动态style
PROPS = 1 << 3, // 8 除去class/style以外的动态属性
FULL_PROPS = 1 << 4, // 16 有动态key属性的节点,当key改变时,需进行完整的diff比较
HYDRATE_EVENTS = 1 << 5, // 32 有监听事件的节点
STABLE_FRAGMENT = 1 << 6, // 64 一个不会改变子节点顺序的fragment (一个组件内多个根元素就会用fragment包裹)
KEYED_FRAGMENT = 1 << 7, // 128 带有key属性的fragment或部分子节点有key
UNKEYEN_FRAGMENT = 1 << 8, // 256 子节点没有key的fragment
NEED_PATCH = 1 << 9, // 512 一个节点只会进行非props比较
DYNAMIC_SLOTS = 1 << 10, // 1024 动态slot
HOISTED = -1, // 静态节点
BAIL = -2 // 表示 Diff 过程中不需要优化
}
先了解一下静态标记有什么用?看个图
在什么地方用到的呢?比如下面这样的代码
<div id="app">
<div>沐华</div>
<p>{{ age }}</p>
</div>
在 Vue2 中编译的结果是,有兴趣的可以自行安装 vue-template-compiler 自行测试
with(this){
return _c(
'div',
{attrs:{"id":"app"}},
[
_c('div',[_v("沐华")]),
_c('p',[_v(_s(age))])
]
)
}
在 Vue3 中编译的结果是这样的,有兴趣的可以点击这里自行测试
const _hoisted_1 = { id: "app" }
const _hoisted_2 = /*#__PURE__*/_createElementVNode("div", null, "沐华", -1 /* HOISTED */)
export function render(_ctx, _cache, $props, $setup, $data, $options) {
return (_openBlock(), _createElementBlock("div", _hoisted_1, [
_hoisted_2,
_createElementVNode("p", null, _toDisplayString(_ctx.age), 1 /* TEXT */)
]))
}
看到上面编译结果中的 -1 和 1 了吗,这就是静态标记,这是在 Vue2 中没有的,patch 过程中就会判断这个标记来 Diff 优化流程,跳过一些静态节点对比
静态提升
其实还是拿上面 Vue2 和 Vue3 静态标记的例子,在 Vue2 里每当触发更新的时候,不管元素是否参与更新,每次都会全部重新创建,就是下面这一堆
with(this){
return _c(
'div',
{attrs:{"id":"app"}},
[
_c('div',[_v("沐华")]),
_c('p',[_v(_s(age))])
]
)
}
而在 Vue3 中会把这个不参与更新的元素保存起来,只创建一次,之后在每次渲染的时候不停地复用,比如上面例子中的这个,静态的创建一次保存起来
const _hoisted_1 = { id: "app" }
const _hoisted_2 = /*#__PURE__*/_createElementVNode("div", null, "沐华", -1 /* HOISTED */)
然后每次更新 age 的时候,就只创建这个动态的内容,复用上面保存的静态内容
export function render(_ctx, _cache, $props, $setup, $data, $options) {
return (_openBlock(), _createElementBlock("div", _hoisted_1, [
_hoisted_2,
_createElementVNode("p", null, _toDisplayString(_ctx.age), 1 /* TEXT */)
]))
}
patchKeyedChildren
在 Vue2 里 updateChildren 会进行
- 头和头比
- 尾和尾比
- 头和尾比
- 尾和头比
- 都没有命中的对比
在 Vue3 里 patchKeyedChildren 为
- 头和头比
- 尾和尾比
- 基于最长递增子序列进行移动/添加/删除
看个例子,比如
- 老的 children:
[ a, b, c, d, e, f, g ]
- 新的 children:
[ a, b, f, c, d, e, h, g ]
- 先进行头和头比,发现不同就结束循环,得到
[ a, b ]
- 再进行尾和尾比,发现不同就结束循环,得到
[ g ]
- 再保存没有比较过的节点
[ f, c, d, e, h ],并通过 newIndexToOldIndexMap 拿到在数组里对应的下标,生成数组 [ 5, 2, 3, 4, -1 ],-1 是老数组里没有的就说明是新增
- 然后再拿取出数组里的最长递增子序列,也就是
[ 2, 3, 4 ] 对应的节点 [ c, d, e ]
- 然后只需要把其他剩余的节点,基于
[ c, d, e ] 的位置进行移动/新增/删除就可以了


